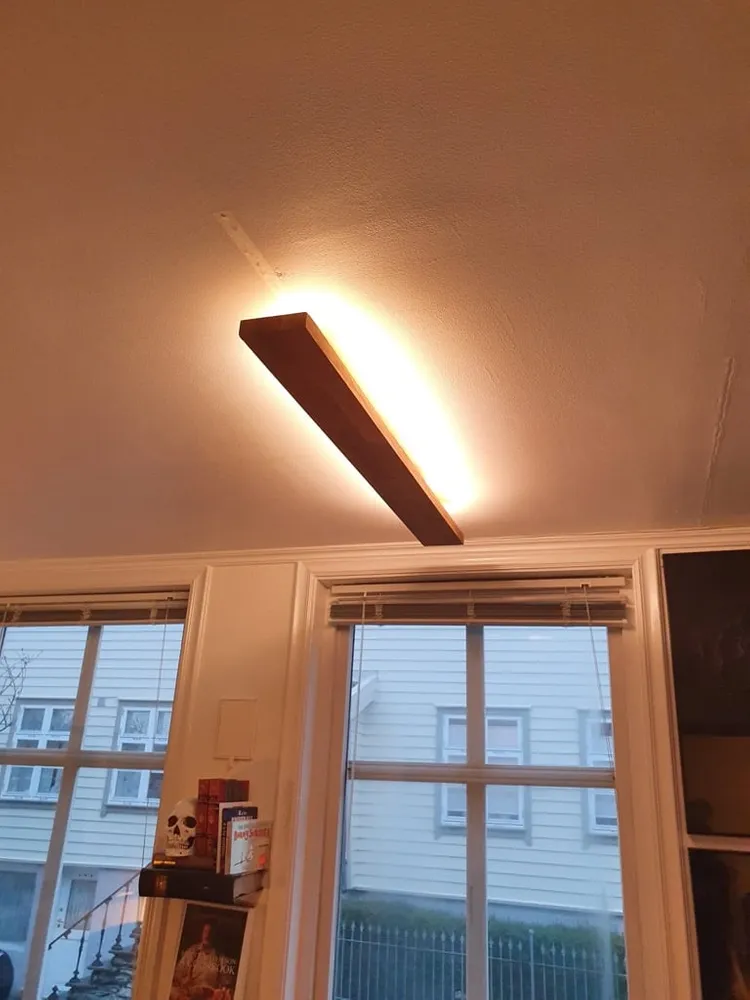
안녕하세요 이케아 해커스의 아스키입니다. 오늘은 B. Alexander 씨의 해킹을 소개하고자 합니다. 미국은 우리나라와 달리 천장 등이 없어서 간접 조명을 많이 쓰는데요, 문화의 차이만큼 간접조명을 이용해 좀 더 은은한 인테리어를 뽐낼 수 있는 서구문화에 요즘 우리나라 사람들도 많이 참고하고 있답니다.
간접 조명 종류가 많지만 이케아 재료를 이용해 멋진 시그니쳐 팬던트 조명을 만든 B. Alexander 씨의 사례를 지금 한번 살펴볼까요? 시간은 금입니다. 바로 시작할게요!
알렉산더는 부엌 조리대를 자르고 난 후 남은 나무가 있었는데 낭비하고 싶지 않았습니다. 결국 부엌에 싱크대를 만들고 남은 상판으로 펜던트 조명을 만들게 되었답니다.
Hello, this is Ikea Hackers' ASCII. Today I would like to introduce B. Alexander's hack. Unlike Korea, the United States does not have a ceiling lamp, so indirect lighting is used a lot.
There are many types of indirect lighting, but let's take a look at the example of Mr. B. Alexander, who made a cool signature pendant light using IKEA materials. Time is gold. Let's get started!
Alexander had some wood left over after he cut down the kitchen countertop and didn't want to waste it. Eventually, he built a sink in the kitchen and made pendant lights from the leftover countertops.
사용된 재료 :
KARLBY 조리대에서 스크랩 조각 (무료, 컬뷔는 새 상품을 구입하기엔 비싸요!)
LEDBERG LED 스트립 컬러 (인터넷에서 대체상품으로 더 저렴하게 구입할 수 있어요.)
스크랩 우드 블록 (무료) (선택 사항)
나사 4 개
후크 4 개
 |
 |
| KARLBY 싱크대상판(대체상품) 제품 자세히보기 |
LED스트립 컬러 제품 자세히보기 |
몇가지 주의 사항 알려드릴게요 이케아 컬비 싱크대 상판은 크기가 큰만큼 비용이 상당하답니다. 컬뷔를 이용하기보다는 인터넷에서 목재 상판을 이용해 알맞게 사용하는 것을 권해드려요.
(알렉산더 씨는 컬뷔를 쓰고 남은 재료를 이용해 만들었기 때문에 저렴하게 제작이 가능했답니다.)
상판만 자신의 방에 알맞은 사이즈를 구한다면, 어려운 프로젝트가 아닙니다. 시간이 걸린 유일한 부분은 케이블 관리였습니다. 중요한 부분은 LED 스트립이 나무의 경계 안에 깔끔하게 자리 잡고 한눈에 보이지 않는지 신중하게 확인하는 것입니다.
Here are a few things to keep in mind: IKEA KARLBY sink tops are expensive because of their large size. Rather than using curlby, we recommend that you use a wooden top on the Internet and use it appropriately.
(Mr. Alexander made it using materials left over from KARLBY, so it was possible to make it cheaply.)
It's not a difficult project if you just find the right size for your room. The only part that took time was cable management. The important part is to carefully make sure that the LED strip sits neatly within the perimeter of the tree and is not visible at first glance.


나무 상판을 크기에 맞게 자르고 빛의 너비 중앙을 따라 배치합니다. (상판 절단이 어렵다면 인터넷 주문시 상판 사이즈에 맞게 주문하면 절단해준답니다. 참고하세요.) 빛이 더 부드러워지기를 원한다면 끝 블록을 메인 조각에서 더 멀리 배치하세요. 모든면에서 빛을 고르게 하고 싶다면 내부 나무 블록을 정가운데로 잘 배치하셔야 됩니다.
Cut the wooden top to size and place it along the center of the width of the light. If you want the light to be softer, place the end block further away from the main piece. If you want to even out the light from all sides, you need to place the inner wooden blocks well in the center.

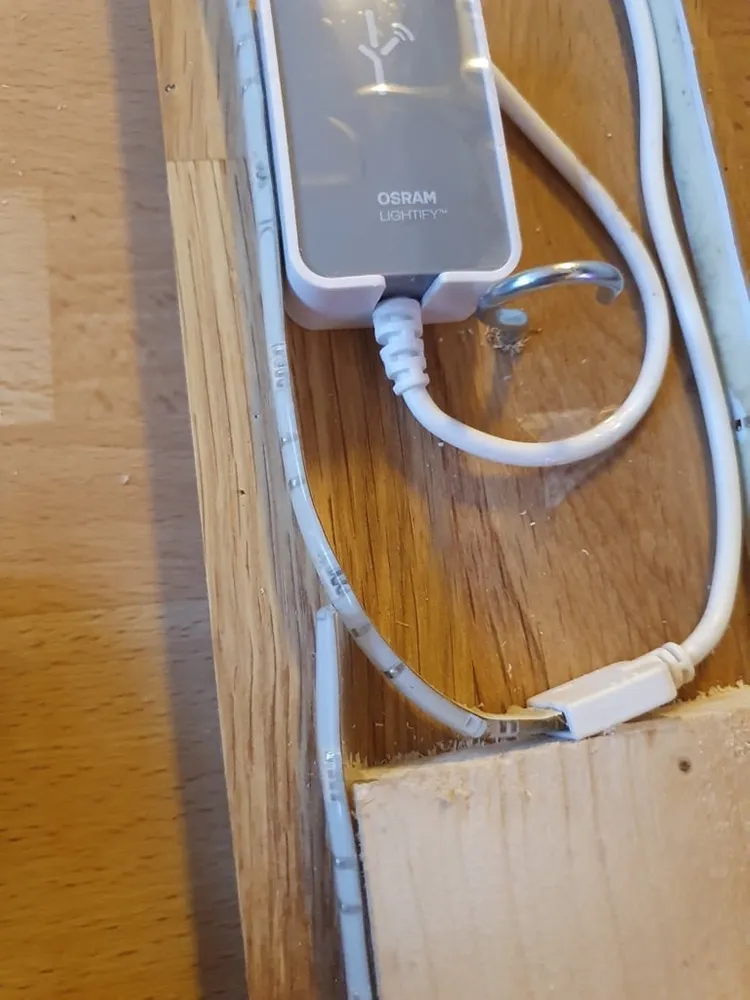
전원 어댑터를 설치하시고 LED 스트랩도 나무블록에 알맞게 감아 줍니다.
Install the power adapter and wrap the LED strap properly around the wooden block.

전원 공급 장치를 연결할 좋은 위치를 찾으세요~! 훅을 조입니다. 전원 어댑터는 오스람 제품을 사용했어요. 굳이 오스람 제품 말고도 모든 LED스트랩은 와트에 맞게 어댑터를 구입해서 사용하시면 됩니다.
Find a good place to connect the power supply! Tighten the hook. The power adapter is an OSRAM product. Except for OSRAM products, all LED straps can be used by purchasing an adapter according to the wattage.

훅은 천장에 조명을 매달거나, 아니면 걸어 놓을 때 좋은 아이템입니다. 굳이 필요 없다면 설치 안 하셔도 됩니다.
Hooks are a great item for hanging or hanging lights from the ceiling.
If you don't need it, you don't have to install it


자 이제 멋지게 사용을 하시면 됩니다. 전기 작업은 필히 차단기를 내리고 작업을 하셔야 됩니다~!
그럼 오늘도 해피해킹!
Now, you can use it nicely. Electrical work must be done with the circuit breaker turned off!
Then happy hacking today!
'HACKS' 카테고리의 다른 글
| 나만의 멋진 독립형 욕실 세면대 만들기 (0) | 2021.06.09 |
|---|---|
| 큰 반려견을 위한 애완용 그릇 만들기 (0) | 2021.06.08 |
| IKEA 플로어 조명 선반 만들기 (0) | 2021.06.03 |
| VARIERA으로 심플한 욕실 선반 만들기 (0) | 2021.06.02 |
| 우리 아이를 위한 전시 액자 만들기 (0) | 2021.06.01 |


