안녕하세요 이케아 해커스의 아스키입니다. 욕실에 세면대가 너무 오래되었거나, 세탁실에 애벌빨래용 세면대가 필요한 경우가 있을 거예요. 설치를 하려면 설치비만 수십만 원이 깨지는 현실에 좌절하는 경우가 대부분이지요.
기존에 있는걸 그대로 쓰면 되겠지만, 그래도 이케아로 간편하고 멋진 세면대를 만들 수 있다는거 아시나요? 시간은 금입니다. 지금부터 바로 시작합니다.
Corinne 씨는 세면대가 너무 오래되서 기존에 세면대를 철거를 하게 되었답니다. 하지만, 세면대를 설치할 비용이 부담이었지요. 그래서 생각한 것이 가지고 있는 이케아 주방 카트를 이용해 멋진 독립 세면대를 만들자는 것이었습니다.
물론 쉽지는 않지만, 합리적인 가격으로 그것도 멋진 북유럽풍의 세면대를 가질 수 있다는 것이 큰 메리트로 다가왔습니다.
Hello, this is Ikea Hackers' ASCII. Maybe the sink in the bathroom is too old, or the laundry room needs a pre-wash sink. Most of us are frustrated with the reality of breaking hundreds of thousands of won in installation costs.
You can use what you already have, but did you know that you can still make a simple and stylish washbasin with IKEA? Time is gold. Let's start right now.
Corinne said the sink was so old that she had to demolish it. However, she was burdened with the cost of installing a sink. So, what she was thinking was to make a nice standalone sink using the IKEA kitchen cart she had.
Of course, it's not easy, but being able to have a nice Nordic style washbasin at a reasonable price has come as a big advantage.
사용한 IKEA 품목 :
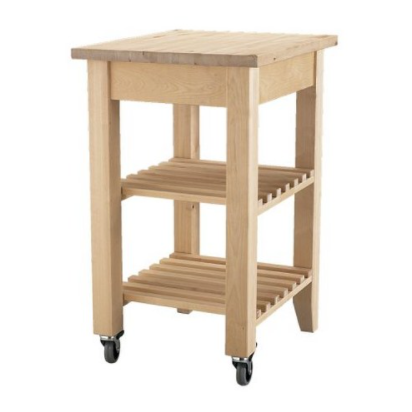
BEKVÄM 주방 카트 (대체 상품으로 대체하셔도 되요)
기타 제작에 필요한 도구 :
사포 (180 방 이상)
목재 컬러 스테인(가구 페인트)
마린 바니시 (방수 마감 용)
세면대 싱크와 수도꼭지 (이케아제품 또는 타제품으로 대체해도 되요)
직소 또는 유사한 절단 도구 (톱)
배관 코킹
장식 바구니 (선택 사항)
조정 금속 마감의 새로운 p- 트랩 (옵션)
 |
 |
| BEKVÄM 주방 카트 제품 자세히보기 |
이케아 TYNGEN 튕엔 세면기 제품 자세히보기 |
IKEA 욕실 세면대 제작 방법 :
1. 먼저 바퀴가 없는 두 다리를 더 짧은 다리와 같은 높이로 잘라요. 카트를 조립해요. 상단 선반을 올려놓지 마세요. (사진 보면 싱크 배관 설치를 하기 위해서 분해야 해 해요.)
참고 : 선반은 다른 유형의 배관 설비가 있는 싱크대에 맞을 수 있어요. 설비하시는 분에게 확인하셔야 해요
1. First, cut the two legs without wheels to the same height as the shorter legs. Assemble the cart. Do not place the top shelf on top. (If you look at the picture, you have to disassemble it to install the sink pipe.)
Note: Shelves may fit sinks with different types of plumbing fixtures. You need to check with the person who installs it.

2. 주방 카트를 사포질 합니다. (나무의 꼭대기 부분만 사포질 했어요.) 거친 사포부터 부드러운 사포로 넘어갑니다.
2. Sand the kitchen cart. (I only sanded the top of the tree.) I go from coarse sandpaper to soft sandpaper.

3. 카트(옵션)를 목재용 페인트로 염색하고 사용 설명서의 지침에 따라 말리세요
4. 마지막으로 마린 바니시를 최소 3 회 도포하고 코팅 사이에 건조 상태로 둬요.(지정된 대로). 조각에 4 회를 했고, 사람들은 보트 데크에 해양 광택제를 사용해요. 일반적인 폴리 우레탄보다 훨씬 더 내구성이 좋답니다.
5. 원하는 곳에 카트를 욕실에 놓고. 배관이 들어갈 위치를 결정하고 배수관을 위해 조리대에 구멍을 뚫어요.
※ 더 나은 방법 : 설비공에 문의해서 진행해도 됩니다.
6. 설비공이 세면대와 배관을 설치해요. 물론 원하는 경우 직접 설치할 수 있습니다.
3. Dye the cart (optional) with wood paint and dry it according to the instructions in the instruction manual.
4. Lastly, apply at least 3 coats of marine varnish and allow to dry between coats. (as specified). Loaded 4 times on the piece, people use marine polish on their boat decks. Much more than normal poly merchandise
5. You need to install the cart where you want it. The plumbing determines the location of the repair and drills a hole in the countertop for the drain pipe.
※ Better method: You can proceed by contacting the installer.
6. A plumber installs the organizer and plumbing. Of course you can do it yourself if you want.

완성입니다. 멋진 나만의 세면대가 완성되었습니다. 자세한 내용은 이케아 해커스 영문 사이트에서도 확인 가능합니다.
그럼 오늘도 해피 해킹!
Completion. Your own stylish bathroom sink is complete. For more information, you can also check the IKEA Hackers English site. Then Happy Hacking today!
본 게시글은 ikeahackers.net 의 허락을 받아 작성되어진 글입니다. 원작자 및 ikeahackers.net 의 동의없이 사용 할 수 없습니다.
This post was written with the permission of ikeahackers.net. It may not be used without the consent of the original author and ikeahackers.net.
Attribution by Corinne
https://www.ikeahackers.net/2021/03/floating-cat-shelves-ikea.html
'HACKS' 카테고리의 다른 글
| 올인원 맥주병 건조대 만들기 (0) | 2021.06.18 |
|---|---|
| 이케아 옷걸이 하나로 멋진 자전거 거치대를 만드는 법 (0) | 2021.06.11 |
| 큰 반려견을 위한 애완용 그릇 만들기 (0) | 2021.06.08 |
| 주방 싱크대로 팬던트 조명 만들기 (0) | 2021.06.07 |
| IKEA 플로어 조명 선반 만들기 (0) | 2021.06.03 |


